How to build a WiFi-ready freezer alarm for under $35
There are many high-tech freezer alarm systems that will send you notifications if the temperature of your freezer goes above a certain value. These systems are expensive and, therefore, not always the top priority in the expenditures list in many laboratories. The problem is that if a freezer brakes, valuable samples could be lost and careers seriously harmed.
Frustrated with the dilemma of choosing between expensive monitoring systems and having peace of mind, I decided to build my own freezer alarm. This Raspberry Pi -based alarm system requires a Wi-Fi network and a power supply. If there is a power outage and the WiFi networks and/or the power goes off, the system will not work. I would hope that for those extreme cases there is a system put in place at the university level to alert the many people affected. The problem the current system is intended to solve is the one that happens when one of your freezers dies in the middle of the night during the weekend and nobody is in the lab (happened twice in my lab).
With this alarm system you will get (and your lab members) an email, and if you want, also a notification to your Echo device (if you have one). It will also record the time and temperature every 6-7 seconds and it will store on the SD card the measurements corresponding to the last >24 hours (see graph below). Finally, it will send an email every day reporting the temperature of the freezer at 11:45 AM so you know the system is working properly.
I know that not everyone finds it relaxing to play around with Arduinos and Raspberry Pi’s, so I have tried to simplify the process of building this device as much as possible so you can build your own.
All you will need is:
A Raspberry Pi Zero W (with Wi-Fi) $27 or better a Raspberry Pi 3 Model B $46
A micro SD card $6.5
A DS18B20 temperature IC sensor $1.2
30 Gauge Flexible Silicone Rubber Electric Wire or similar (>$1)
4.7kOhm Resistors ($0.06)
One inch Self Adhesive Hook and Loop (>$1)
Soldering iron and solder.

Step 1. The hardware.
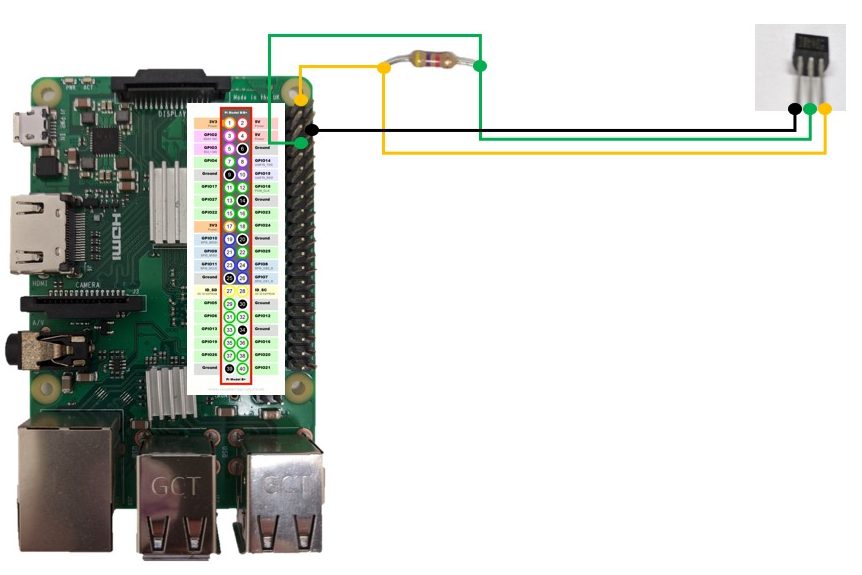
You will need to connect the 4.7kOhm resistor to pins 1 (3-volt power pin) and 7 (GPIO4 1-wire pin) on the Raspberry Pi (see picture below).
Orienting the DS18B20 temperature IC so the pins are facing you and the flat surface is up (see image below), connect the rightmost pin of the temperature sensor to the Raspberry Pi pin 1, the middle pin of the sensor to the Raspberry Pi pin 7, and the left pin of the sensor to the Raspberry Pi pin 6 (ground). Use sufficient electric cable when making these connections so that the sensor can be placed inside of the freezer while the Raspberry Pi is outside near a power outlet (ideally one with emergency power).
After you make all these connections, your hardware is ready.

Step 2. Installing the Software
I have made a disk image you can download from here, so you do not need to do most of the command line settings. If you are familiar with Raspberry Pi you can just download my Python scripts and general instructions from here. After you have downloaded the disk image to your Desktop, you will need to copy it into an empty micro SD card.
a) Connect a new 32 GB micro SD card to your computer (in this example a Mac).
b) Open the terminal and check the name of the SD card by typing:
diskutil list
c) Find in the list of devices the one corresponding to your 32 GB card. In this example, the name of the SD card device is disk4. Make sure you identify the right device corresponding to your micro SD card, as you will delete the content of the selected device in the following steps. In the commands you will type in your terminal, replace disk4 from my example below by the device name of your micro SD card.
d) In the terminal type:
diskutil unmountDisk /dev/disk4
Press enter and then in the next line type:
sudo newfs_msdos -F 16 /dev/disk4
Press enter. You will be asked to enter a password. That is the password corresponding to your username on the computer you are using. After it finished creating the file system, type in the next line of the terminal:
sudo dd if=~/Desktop/TemperatureRaspi.dmg of=/dev/disk4 bs=1m
It will take 20-30 minutes to copy the whole system onto your SD card. After it is finished, you will have a copy of the Raspberry Pi freezer alarm booting system on your SD card. You can now directly insert this SD card in your Raspberry Pi.
e) After you insert the SD card in your Raspberry Pi, you will need to connect a monitor or TV to the HDMI connection in your Raspberry Pi, as well as a keyboard and a mouse, to two of the USB ports in your Raspberry Pi.
Step 3. Setting up your Raspberry Pi WiFi and freezer alarm.
Your Raspberry Pi needs to connect to a WiFi network to be able to send you messages with the temperature information.
a) To set up the WiFi in your Raspberry Pi, just click in the WiFi symbol (see below) at the top right side of the screen, choose your WiFi network, and enter the corresponding password.
b) Next, you will need to open the terminal (see below) in your Raspberry Pi and type:
sudo python Temperature-raspiv3.py


c) This will open an app where you can set up your freezer alarm (see below). You will need to do this only once, as all the information you enter will be stored in the SD card. First, you should enter the email address you will be using to send notifications about the freezer (Enter sender’s email address). I recommend that you create a google account dedicated exclusively for this purpose, as you will need to reduce the security level of this email account to allow communication with the Raspberry Pi. To do that, you will need to go to “manage your google account” when creating the new account and click in the icon for this account at the right top corner of your email. Then, select the Security tab at the left side of the page and then turn on the “Less secure app access” option. Now you can enter the address of this new email account you just created in the first line of the Raspberry Pi app (Enter sender’s email address). In the next line, enter the password for this new email account (Enter sender’s email address password). Next, you can enter as many email addresses as you want (Enter the list of recipients’ email addresses). Every time you enter an address, press “return” to type a new address in the next line. To use Alexa notifications (see below), you will need to include the following address trigger@applet.ifttt.com in the recipients’ list. You should also add a freezer identifier, so the notifications will be able to indicate which freezer is the one having problems (if you have several of them). This should be a single word identifier. And finally, you should enter the temperature limit above which you wish to get an email indicating the temperature is too high (Set alarm temperature). After you have entered all this information, click the Upload information button. You can also click the START button to test that everything is working. The actual temperature of the sensor would be displayed at the bottom of the app (The current temperature is:). In this example, our freezer’s temperature was -78.437C

d) You can now turn off your Raspberry Pi by clicking in the red raspberry at the top left corner and choosing the last option (Shutdown) at the bottom (see example):
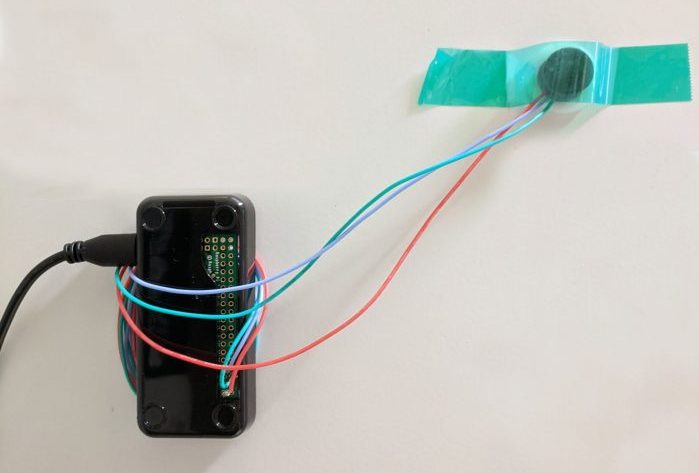
e) Now you can install your Raspberry Pi freezer alarm in your freezer. If your freezer has the option, put the temperature sensor into the freezer using an access point specifically designed for inserting a probe. If not, you can just put it through the door. The electric cables are very thin and should not create any problems. You can attach your Raspberry Pi freezer alarm to the side of your freezer using self-adhesive hook and loop tape.

f) To turn on your freezer alarm, simply plug it into a power outlet (ideally, an outlet with emergency power). You can test your freezer alarm by taking the IC sensor out of the freezer for a few seconds. You should get an email indicating the temperature is above that set as the limit (if the limit is below the room temperature). As I said, every day you should get an email to the account you set with the “less secure app” turned on indicating that everything is working properly.
Step 4. Controlling and monitoring your freezer alarm remotely (optional)
The following steps will allow you to establish a remote connection with your Raspberry Pi, so that you don’t have to plug a monitor and keyboard to control your Raspberry Pi every time you want to access it. You can also check from home the actual temperature, etc.
a) You will need to open a VNC account. To do that, just go to this address “https://manage.realvnc.com/en/?_ga=2.149307955.444456216.1574435969-431599551.1573482897” and follow the instructions. It is free (at least for up to five devices), but you can donate if you want to.
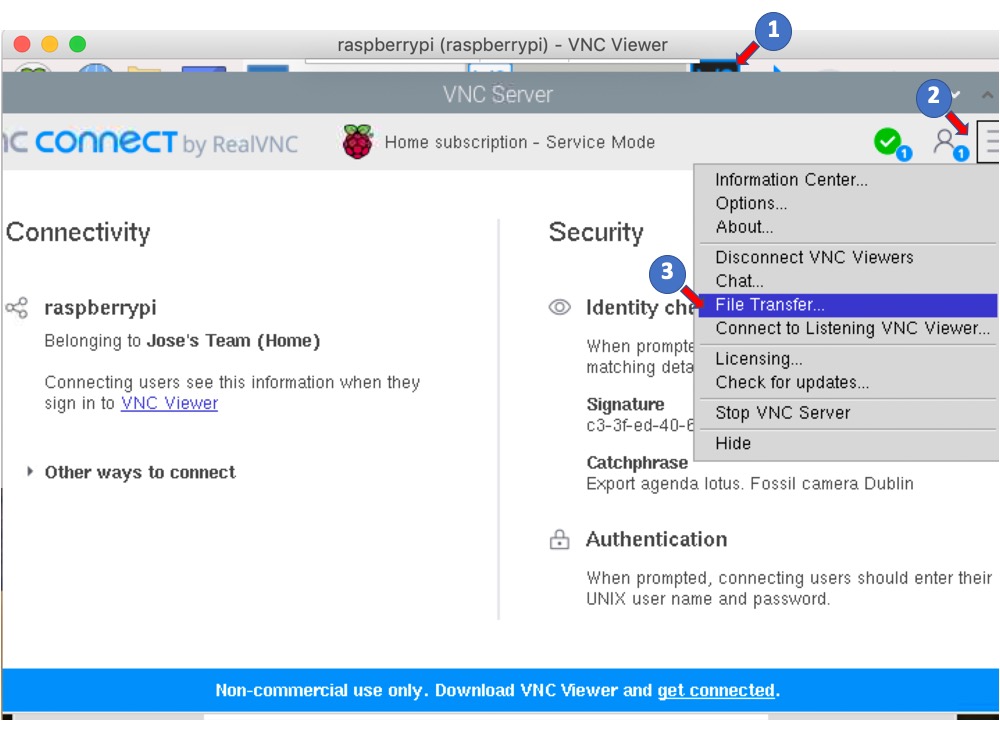
b) After you have opened an account, you can go to your Raspberry Pi and click in the VNC logo (Va) in the top-right menu ( label as 1 in the example below). In the VNC server window, click in the box with the three horizontal lines in the top right corner and then select the “licensing” option. Here enter the email and password you used when you created your VNC account on your computer. You will be given the opportunity to give a specific name to this device, which is very convenient in case you have multiple freezer alarms.
c) After you have done that, you should be able to connect to your Raspberry Pi from your computer using the VNC viewer you previously downloaded on your computer.
d) Now you can easily transfer files from the Raspberry Pi to your computer and vice versa. For example, to transfer the files containing the temperature measurements for the last >24 hours, connect to your Raspberry Pi using the VNC viewer on your computer. Click on the Va logo at the top-right menu (1). Click in the square with the three horizontal lines (2) and select the File Transfer… option (3). Select the ‘other option’ in the Fetch files to: (4) and then select the /home/pi/ directory (5).
e) Click Send files (6) and a window with the content of the /home/pi directory will open. Now, select the files timelist.txt and temperaturelist.txt. Then select where you want to download these files on your computer using the window that will open, and your files will be transferred from your Raspberry Pi to your computer.


Step 5. Send voice notifications to your Echo device (optional)
The following steps will show you how to send a notification from your Raspberry PI freezer alarm system to your Echo device. This will cause Alexa to alert you that you have a new message. Then you can ask Alexa to “read notifications” and Alexa will tell you the temperature and the name of the freezer (as you named it in Step 3 part c) that has reached a temperature above the set limit. While the temperature in the freezer remains above the set point, the alarm system will send you a notification every ten minutes.
To be able to send notifications from your Raspberry Pi to your Echo device you will need to:
a) Download (if you have not done it yet) and open the Alexa app on your phone.
b) Select Skills & Games.
c) Find (search) the skill Notify Me.
d) Activate it and then go to your Amazon Echo device and say “open notify me”. This will activate the skill and send you an access code to the email address you use with your Alexa account.
e) Save this code as you will need it later.
Now we need to use IFTTT to create an applet that sends a notification to your Echo device every time your freezer sends an email to the address trigger@applet.ifttt.com with the subject #FreezerAlarm.
f) Go to ifttt.com in your computer and open a free IFTTT account using your freezer alarm Gmail account (the one you use as sender and has the “Less secure app access” option turned on).
g) Select Create by clicking in the user icon in the top right corner next to the Explore button in the ifttt page.
h) Click in the gray This word of If This Then That that appears in the middle of the page.
i) In the Search services, search for the word “email”.
j) Click on the Email applet.
k) You will be asked to enter an email address where they can send you a PIN.
l) After you enter the PIN they sent to your email, you will be presented with two options. Use the Send IFTTT and email tagged as this allows you to be more selective and only receive notifications to your Echo device that have the subject #FreezerAlarm. Your Raspberry Pi system has already been set up for sending emails with this subject.
m) Click on “that” of “If This Then That”. Then search for webhooks.
n) Select this application and then fill the fields as follow:
URL: https://api.notifymyecho.com/v1/NotifyMe
Method: POST
Content Type: application/json
Body: {“notification”:”Body”,”accessCode”:”put here the code you got from Notify Me in Step 5 part e”}
As mentioned above, for this to work, you will need to add the email address trigger@applet.ifttt.com to your list of recipients when you set up your Raspberry Pi in Step 3 part c.
And…. Here you have it, a cheap freezer alarm that will send you voice notifications to your Echo device whenever your freezer’s temperature reaches the alarm set point. In fact, if the freezer temperature goes above the alarm setpoint value, you and everybody in your email list will get an email, in addition to the Alexa notification. When the temperature goes above your alarm set point in the freezer, your Echo device will make a sound indicating that there is a new notification and it will keep flashing until you ask “Alexa read notification”, hopefully not at 2:00 AM (or ever).
And that is all. I hope you find this useful.
We have been running three of these alarms for a few weeks and we have not had any problems. If you stop getting notifications at the expected time every day, check your Raspberry Pi. Every time the Raspberry Pi restarts, even after a power failure, the alarm program should start running automatically. The most likely reason for failure is the corruption of some file in the SD card. In that case, you will need to reinstall the Temperature.dmg image as indicated in step 2 and 3.
Please, let me know if you have any problems at jmalonso@ncsu.edu


